

389 Directory Server ve Client Kurulumu ve Yapılandırılması için aşağıdaki adımları takip edebilirsiniz.
SERVER KURULUMU VE YAPILANDIRMASI
Arge Ortamı
|
1 2 3 |
192.168.177.138 ldapmaster.domain.local ldapmaster 192.168.177.139 ldapslave.domain.local ldapslave 192.168.177.145 client.domain.local client |
Master-Slave yapılandırması için yukarıdaki host bilgililerini kullanacağız.
|
1 2 3 4 5 6 7 8 9 10 11 12 13 14 15 16 17 18 19 20 21 22 |
$ sudo ntpdate pool.ntp.org $ service ntpd restart $ chkconfig ntpd on $ yum update -y $ vim /etc/sysconfig/network (HOSTNAME=ldapmaster.domain.local) $ hostname ldapmaster.domain.local $ ipaddr=$(ifconfig eth1 | grep 'inet addr:' | cut -d: -f2 | awk '{ print $1}' );host1=$(hostname);host2=$(hostname -s);echo "$ipaddr $host1 $host2" >> /etc/hosts $ cat /etc/hosts $ service iptables stop; chkconfig iptables off $ sed -i "s/SELINUX=enforcing/SELINUX=disabled/g" /etc/selinux/config;setenforce 0; $ echo "########## LDAP 389 Server ##########" >> /etc/sysctl.conf $ echo "net.ipv4.tcp_keepalive_time = 300" >> /etc/sysctl.conf $ echo "net.ipv4.ip_local_port_range = 1024 65000" >> /etc/sysctl.conf $ echo "fs.file-max = 96288">> /etc/sysctl.conf $ echo "* soft no file 8192" > /etc/security/limits.d/90-nofile.conf $ echo "* hard nofile 8192" >> /etc/security/limits.d/90-nofile.conf $ echo "ulimit -n 8192" >> /etc/profile $ echo "session required /lib64/security/pam_limits.so" >> /etc/pam.d/system-auth $ rpm -Uvh http://ftp.linux.org.tr/epel/6/x86_64/epel-release-6-8.noarch.rpm $ rpm -Uvh http://rpms.famillecollet.com/enterprise/remi-release-6.rpm $ yum repolist $ reboot |
Sistem üzerinde ön hazırlıklar ardından kuruluma geçebiliriz;
|
1 2 3 4 |
$ yum install 389-ds openldap-clients -y $ rpm -aq | grep -i 389 $ dsktune $ setup-ds-admin.pl —keepcache ( Ctrl+B ve 'ENTER' bir önceki ekrana dönersin) |
Aşağıdaki adımları cevaplayarak kurulumu tamamlayabiliriz.
|
1 2 3 4 5 6 7 8 9 10 11 12 13 14 15 16 17 18 19 20 21 22 23 24 25 26 27 28 29 30 31 32 33 34 35 36 37 38 39 40 41 42 43 44 45 46 47 48 49 50 51 52 53 54 55 56 57 58 59 60 61 62 63 64 65 66 67 68 69 70 71 72 73 74 75 76 77 78 79 80 81 82 83 84 85 86 87 88 89 90 91 92 93 94 95 96 97 98 99 100 101 102 103 104 105 106 107 108 109 110 111 112 113 114 115 116 117 118 119 120 121 122 123 124 125 126 127 128 129 130 131 132 133 134 135 136 137 138 139 140 141 142 143 144 145 146 147 148 149 150 151 152 153 154 155 156 157 158 159 160 161 162 163 164 165 166 167 168 169 170 171 172 173 174 175 176 177 178 179 180 181 182 183 184 185 186 187 188 189 190 191 192 193 194 |
============================================================================== This program will set up the 389 Directory and Administration Servers. It is recommended that you have "root" privilege to set up the software. Tips for using this program: - Press "Enter" to choose the default and go to the next screen - Type "Control-B" then "Enter" to go back to the previous screen - Type "Control-C" to cancel the setup program Would you like to continue with set up? [yes]: < press enter > ============================================================================== Your system has been scanned for potential problems, missing patches, etc. The following output is a report of the items found that need to be addressed before running this software in a production environment. 389 Directory Server system tuning analysis version 23-FEBRUARY-2012. NOTICE : System is x86_64-unknown-linux2.6.32-642.3.1.el6.x86_64 (1 processor). Would you like to continue? [yes]: < press enter > ============================================================================== Choose a setup type: 1. Express Allows you to quickly set up the servers using the most common options and pre-defined defaults. Useful for quick evaluation of the products. 2. Typical Allows you to specify common defaults and options. 3. Custom Allows you to specify more advanced options. This is recommended for experienced server administrators only. To accept the default shown in brackets, press the Enter key. Choose a setup type [2]: <2> ============================================================================== Enter the fully qualified domain name of the computer on which you're setting up server software. Using the form <hostname>.<domainname> Example: eros.example.com. To accept the default shown in brackets, press the Enter key. Warning: This step may take a few minutes if your DNS servers can not be reached or if DNS is not configured correctly. If you would rather not wait, hit Ctrl-C and run this program again with the following command line option to specify the hostname: General.FullMachineName=your.hostname.domain.name Computer name [ldapmaster.domain.local]: < press enter > ============================================================================== The servers must run as a specific user in a specific group. It is strongly recommended that this user should have no privileges on the computer (i.e. a non-root user). The setup procedure will give this user/group some permissions in specific paths/files to perform server-specific operations. If you have not yet created a user and group for the servers, create this user and group using your native operating system utilities. System User [nobody]: < press enter > System Group [nobody]: < press enter > ============================================================================== Server information is stored in the configuration directory server. This information is used by the console and administration server to configure and manage your servers. If you have already set up a configuration directory server, you should register any servers you set up or create with the configuration server. To do so, the following information about the configuration server is required: the fully qualified host name of the form <hostname>.<domainname>(e.g. hostname.example.com), the port number (default 389), the suffix, the DN and password of a user having permission to write the configuration information, usually the configuration directory administrator, and if you are using security (TLS/SSL). If you are using TLS/SSL, specify the TLS/SSL (LDAPS) port number (default 636) instead of the regular LDAP port number, and provide the CA certificate (in PEM/ASCII format). If you do not yet have a configuration directory server, enter 'No' to be prompted to set up one. Do you want to register this software with an existing configuration directory server? [no]: < press enter > ============================================================================== Please enter the administrator ID for the configuration directory server. This is the ID typically used to log in to the console. You will also be prompted for the password. Configuration directory server administrator ID [admin]: < press enter > Password:< password > Password (confirm): < password > ============================================================================== The information stored in the configuration directory server can be separated into different Administration Domains. If you are managing multiple software releases at the same time, or managing information about multiple domains, you may use the Administration Domain to keep them separate. If you are not using administrative domains, press Enter to select the default. Otherwise, enter some descriptive, unique name for the administration domain, such as the name of the organization responsible for managing the domain. Administration Domain [domain.local]: <press enter> ============================================================================== The standard directory server network port number is 389. However, if you are not logged as the superuser, or port 389 is in use, the default value will be a random unused port number greater than 1024. If you want to use port 389, make sure that you are logged in as the superuser, that port 389 is not in use. Directory server network port [389]: <press enter> ============================================================================== Each instance of a directory server requires a unique identifier. This identifier is used to name the various instance specific files and directories in the file system, as well as for other uses as a server instance identifier. Directory server identifier [ldapmaster]: <press enter> ============================================================================== The suffix is the root of your directory tree. The suffix must be a valid DN. It is recommended that you use the dc=domaincomponent suffix convention. For example, if your domain is example.com, you should use dc=example,dc=com for your suffix. Setup will create this initial suffix for you, but you may have more than one suffix. Use the directory server utilities to create additional suffixes. Suffix [dc=domain, dc=local]: <press enter> ============================================================================== Certain directory server operations require an administrative user. This user is referred to as the Directory Manager and typically has a bind Distinguished Name (DN) of cn=Directory Manager. You will also be prompted for the password for this user. The password must be at least 8 characters long, and contain no spaces. Press Control-B or type the word "back", then Enter to back up and start over. Directory Manager DN [cn=Directory Manager]: Password:<manager pass> Password (confirm):<manager pass> ============================================================================== The Administration Server is separate from any of your web or application servers since it listens to a different port and access to it is restricted. Pick a port number between 1024 and 65535 to run your Administration Server on. You should NOT use a port number which you plan to run a web or application server on, rather, select a number which you will remember and which will not be used for anything else. Administration port [9830]: <press enter> ============================================================================== The interactive phase is complete. The script will now set up your servers. Enter No or go Back if you want to change something. Are you ready to set up your servers? [yes]: Creating directory server . . . Your new DS instance 'ldapmaster' was successfully created. Creating the configuration directory server . . . Beginning Admin Server creation . . . Creating Admin Server files and directories . . . Updating adm.conf . . . Updating admpw . . . Registering admin server with the configuration directory server . . . Updating adm.conf with information from configuration directory server . . . Updating the configuration for the httpd engine . . . Starting admin server . . . output: [ OK ] Starting dirsrv-admin: output: [ OK ] The admin server was successfully started. Admin server was successfully created, configured, and started. Exiting . . . Log file is '/tmp/setupZKynnZ.log' |
Kurulumu tamamladık. Kurulum log dosyası; Log file is ‘/tmp/setupZKynnZ.log’. Sunucu üzerinde son ayarlamaları yapalım ve ardından servisin çalışıp çalışmadığı kontrolünü yapalım.
|
1 2 3 4 |
$ chkconfig dirsrv on $ chkconfig dirsrv-admin on $ service dirsrv restart && service dirsrv-admin restart $ ldapsearch -x -b "dc=domain,dc=local" |
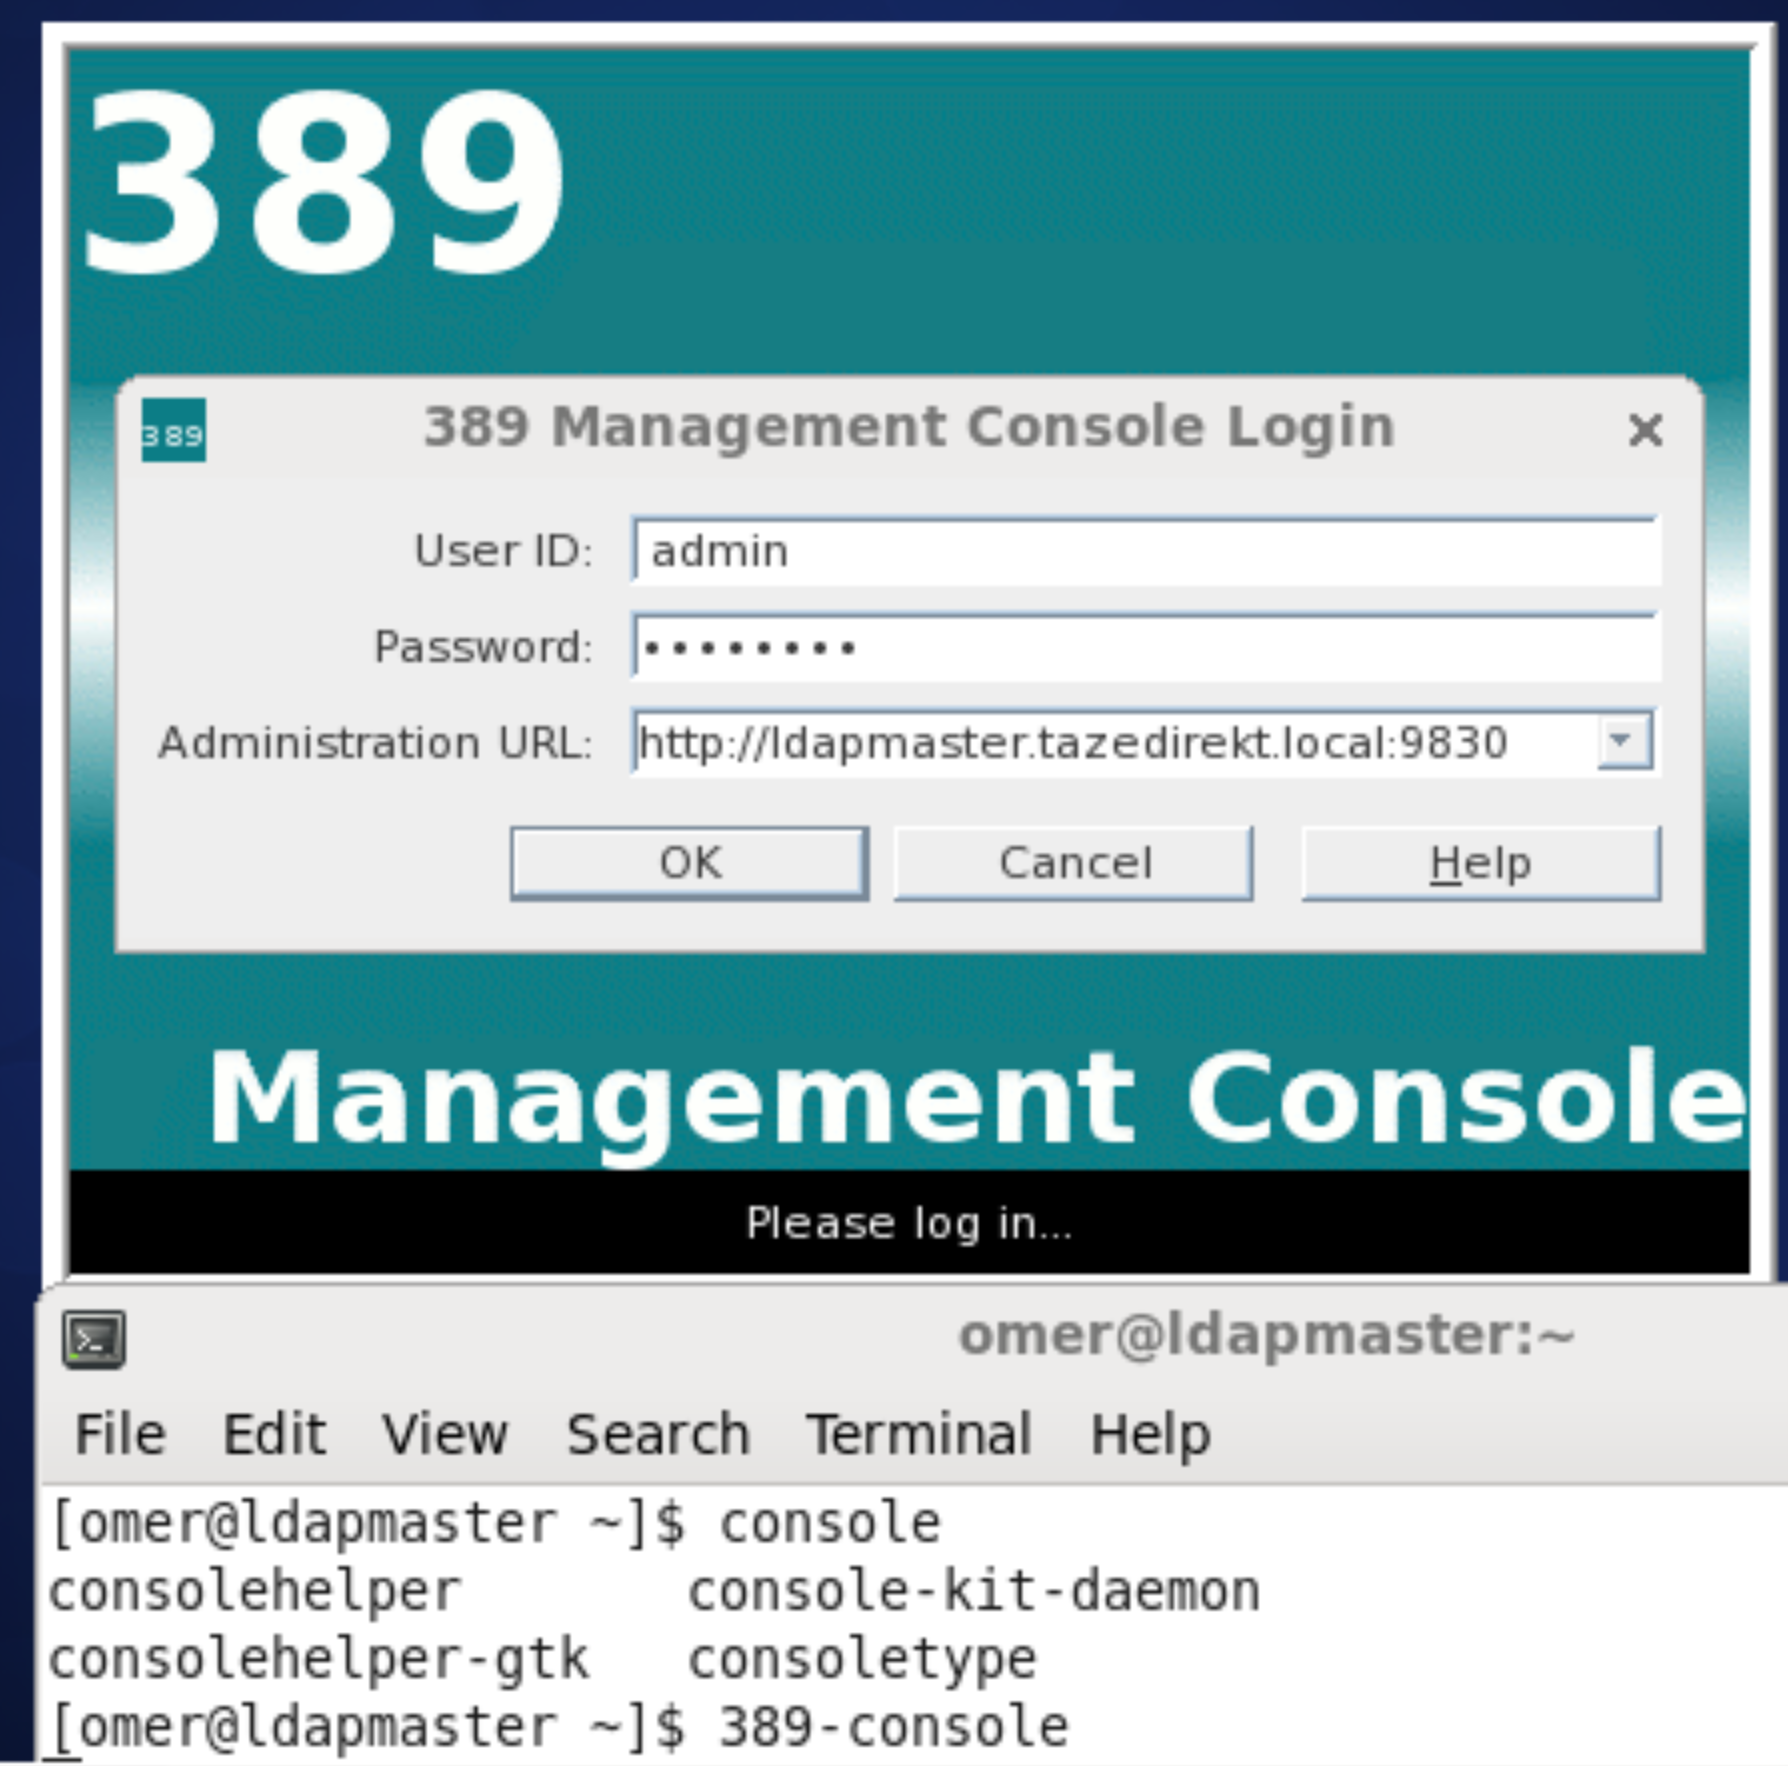
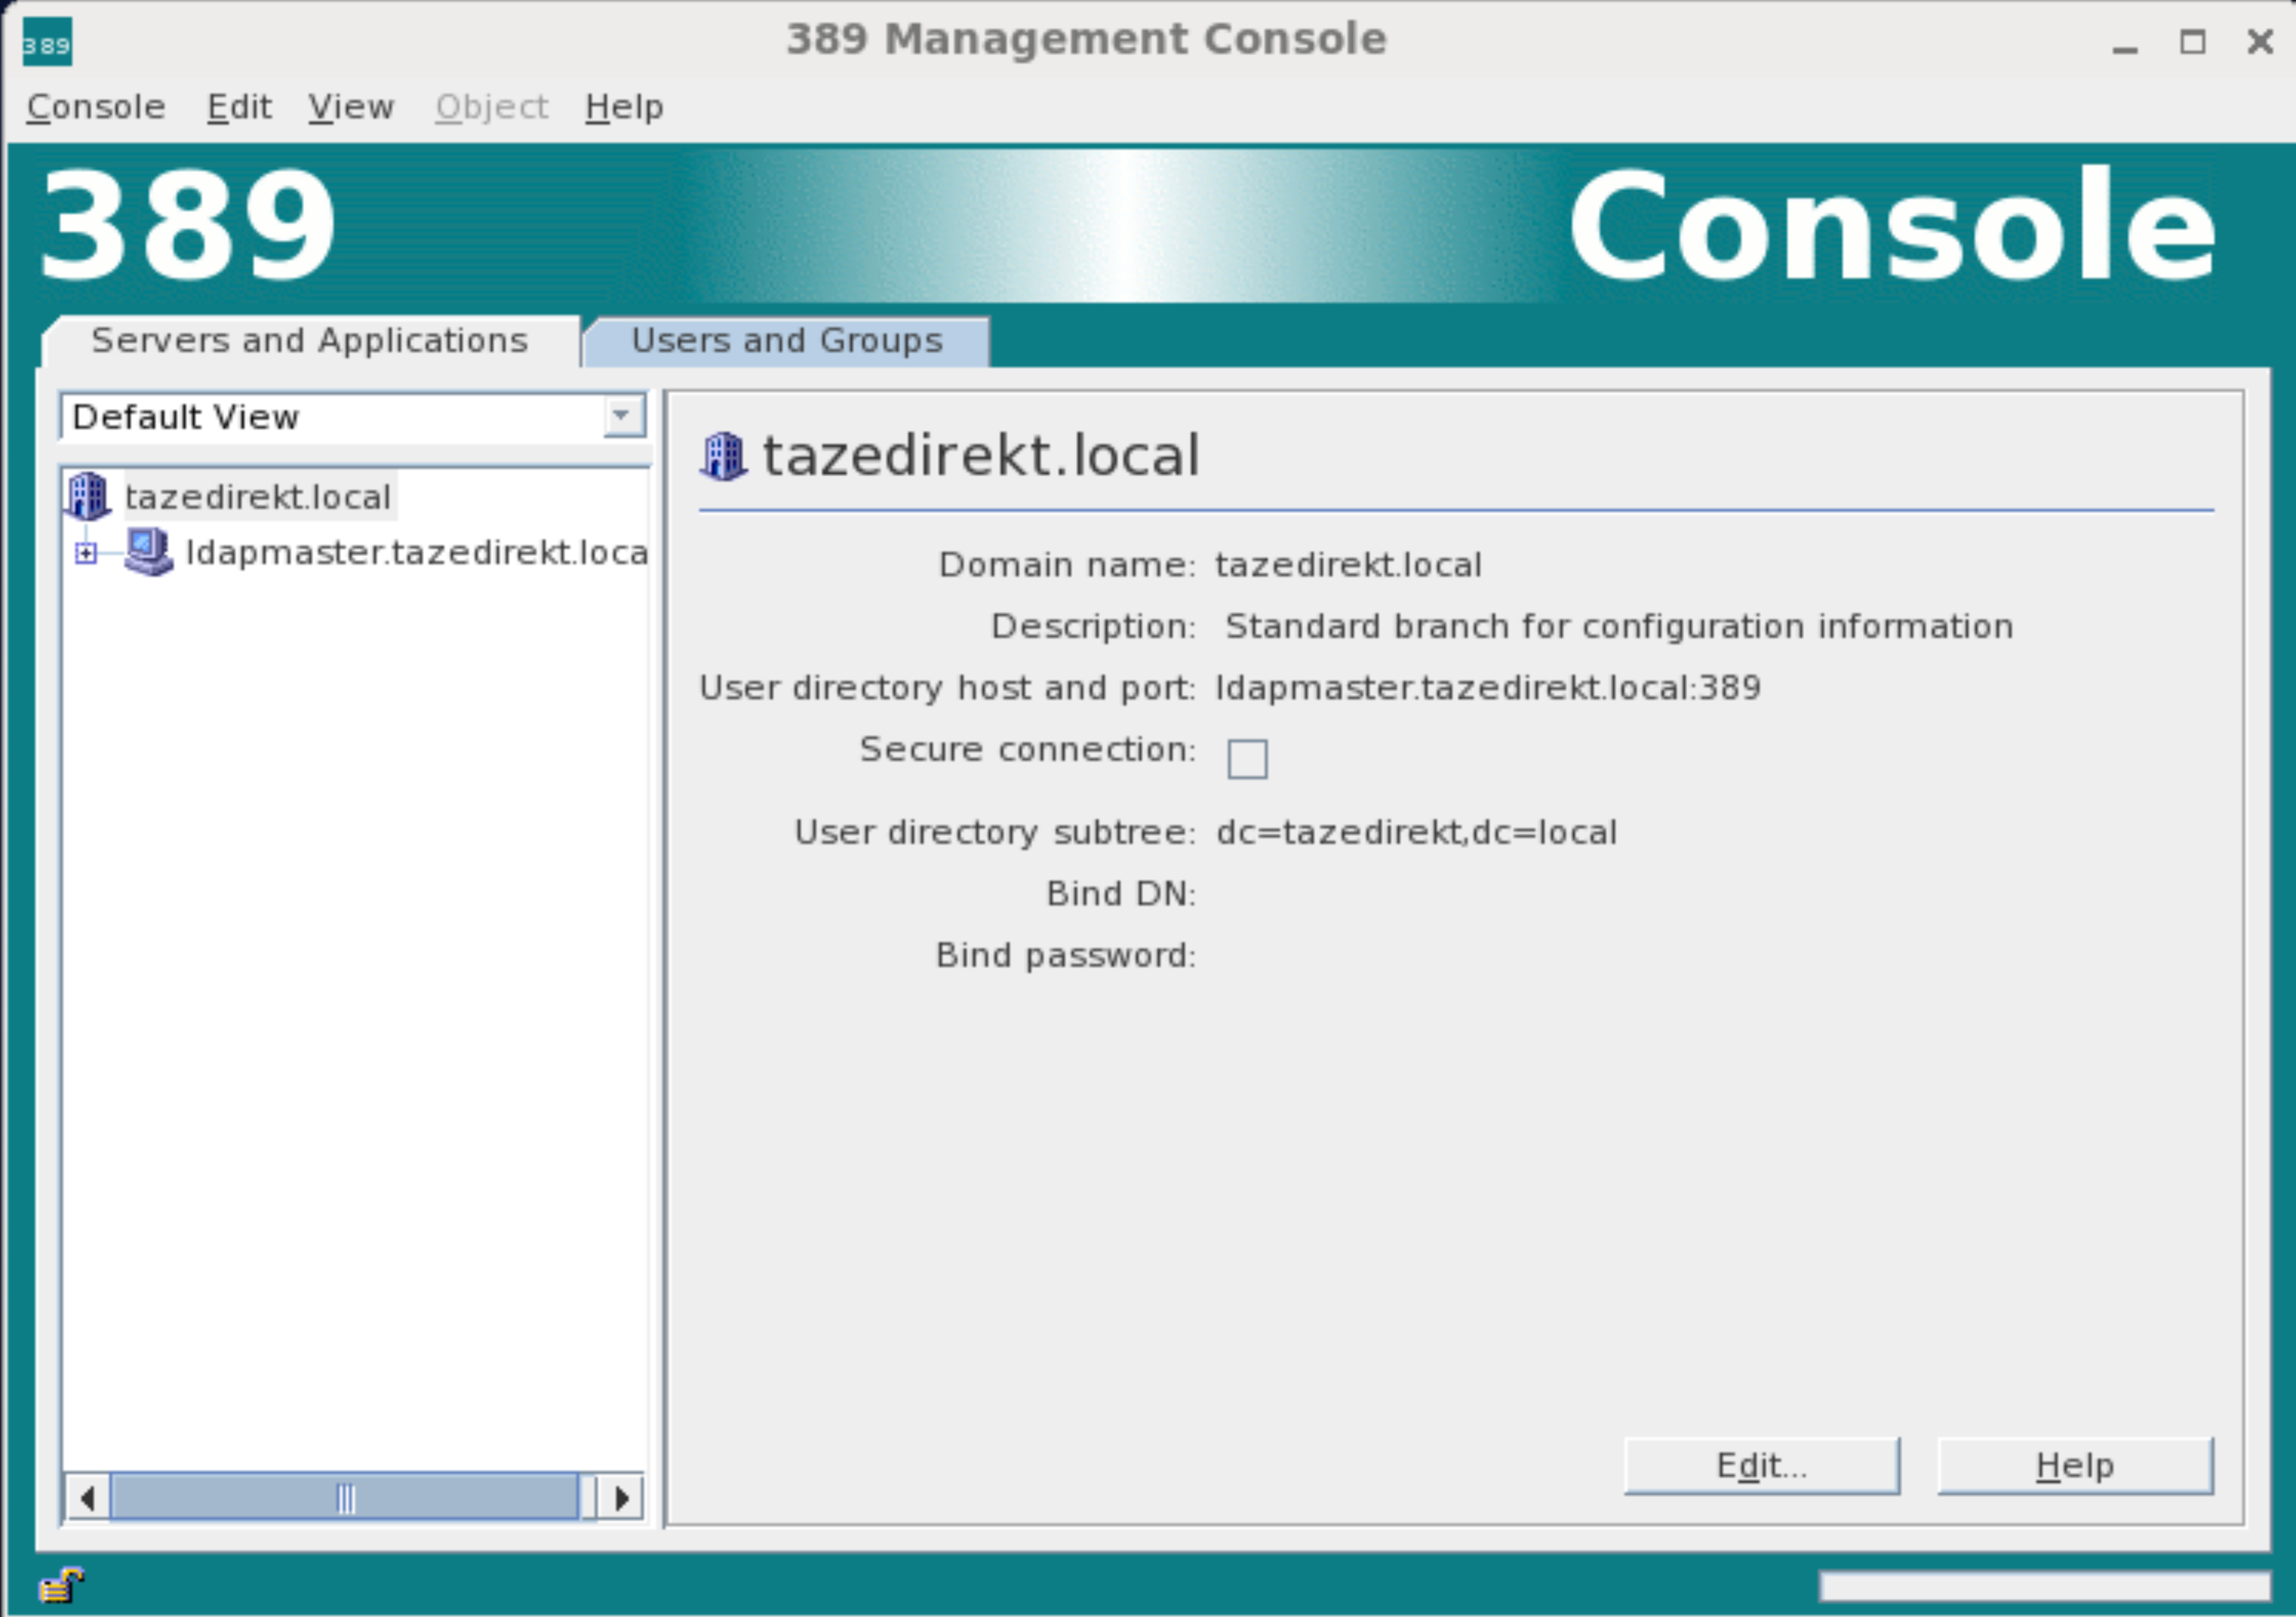
Son olarak gui bağlantısını yapabiliriz. 389 console’a erişebiliriz.
|
1 |
$ 389-console |
Ardından açılan pencerede;
|
1 2 3 |
USER ID :admin Password :<password> Administrator URL:http://ldapmaster.domain.local:9830 |
SSH-PUBLIC KEY YAPILANDIRMASI
Server Tarafı
SSH-PUBLIC Key yapılandırması için Ldap master sunucuda aşağıdaki ldif uzantılı dosyayı;
|
1 |
$ vim /etc/dirsrv/slapd-ldapmaster/schema/98openssh-ldap.ldif |
aşağıdak belirtilen içerik ile oluşturuyoruz.
|
1 2 3 4 5 6 7 8 9 10 11 12 13 14 15 16 17 |
# openssh-ldap schema for 389 # note, it's bit different then for openldap dn: cn=schema # attributetypes: ( 1.3.6.1.4.1.24552.500.1.1.1.13 NAME 'sshPublicKey' DESC 'MANDATORY: OpenSSH Public key' EQUALITY octetStringMatch SYNTAX 1.3.6.1.4.1.1466.115.121.1.40 ) # objectclasses: ( 1.3.6.1.4.1.24552.500.1.1.2.0 NAME 'ldapPublicKey' SUP top AUXILIARY DESC 'MANDATORY: OpenSSH LPK objectclass' MUST uid MAY sshPublicKey ) |
Dosya üzerindeki düzenlemeleri yapıp değişikliğin aktif olması için servisi restart ediyoruz.
|
1 2 3 |
$ cd /etc/dirsrv/slapd-ldapmaster/schema/ $ chown nobody:nobody 98openssh-ldap.ldif ; chmod 440 98openssh-ldap.ldif $ service dirsrv restart |
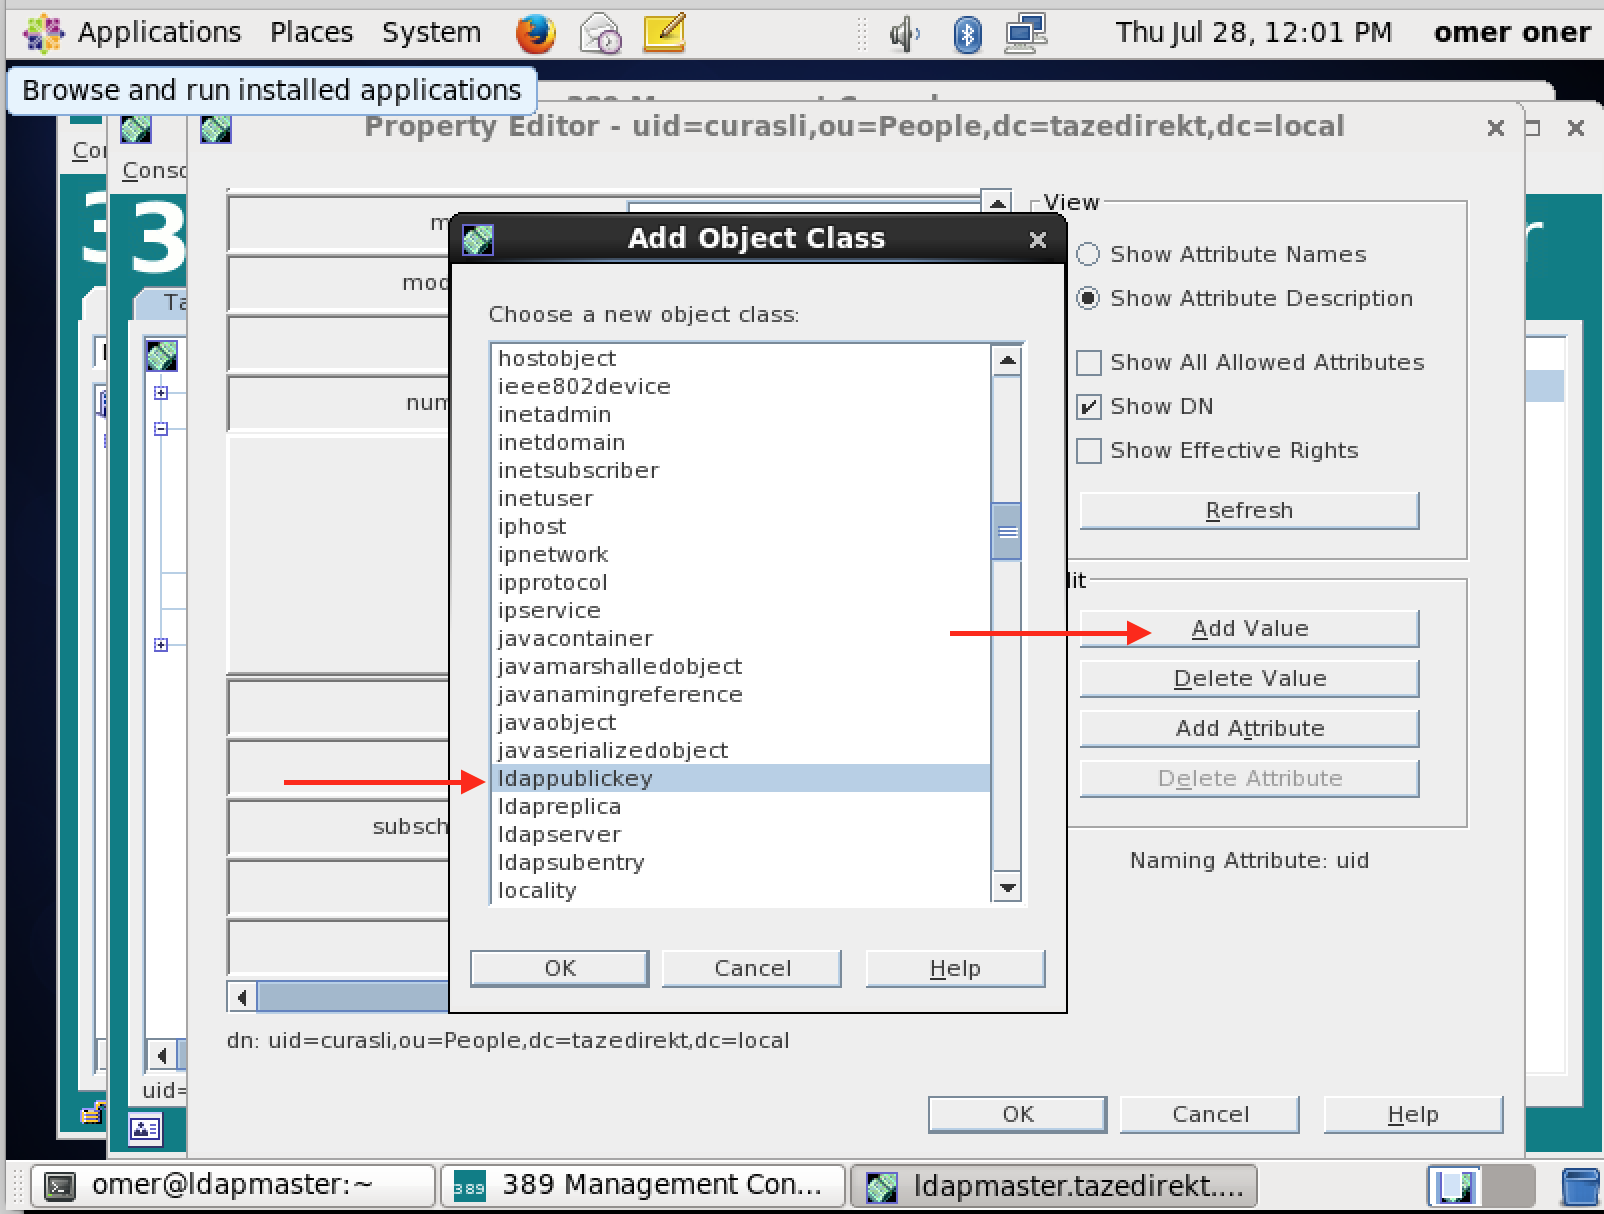
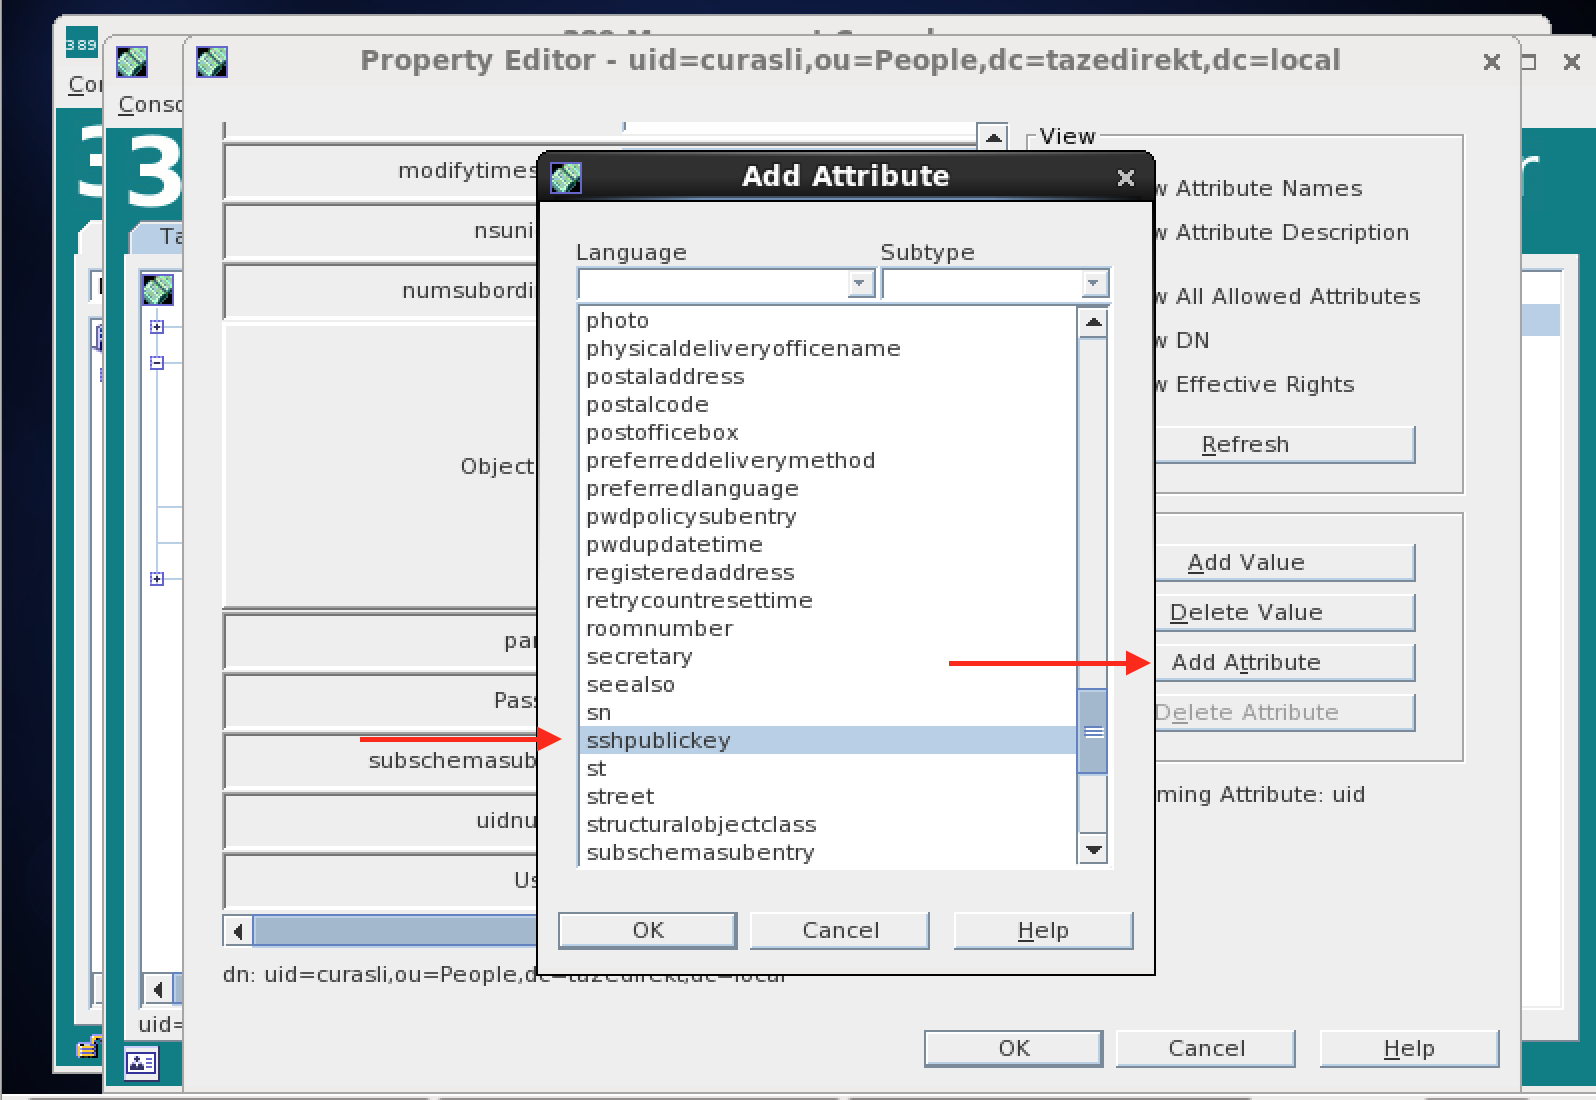
Ldap gui üzerinden ssh-public-key tanımlayacağımız kullanıcın özelliklerinden sırasıyla;
Object Class –> Add Value –> ldappublickey –> OK
Add Attribute –> sshpublickey –> OK
Ardından kullanıcı tarafından oluşturulan public-key girişi yapılır.
Client Tarafı
SSH-PUBLIC Key tanımlaması için client tarafında ssh servisi üzerinden yapılacak değişiklikler.
|
1 2 3 |
$ vim /etc/ssh/sshd_config PubkeyAuthentication yes AuthorizedKeysCommand /usr/local/bin/get-sshkey-from-ldap.sh |
get-sshkey-from-ldap.sh dosyasının içeriği;
|
1 2 3 |
$ vim /usr/local/bin/get-sshkey-from-ldap.sh #!/bin/sh ldapsearch -x '(&(objectClass=ldapPublicKey)(uid='"$1"'))' 'sshPublicKey' | sed -n '/^/{H;d};/sshPublicKey:/x;$g;s/\n *//g;s/sshPublicKey: //gp' |
dosya yetkilendirmeleri ve ldap üzerindeki bir user ile test edilmesi.
|
1 2 |
$ chmod +x /usr/local/bin/get-sshkey-from-ldap.sh $ /usr/local/bin/get-sshkey-from-ldap.sh omeroner |
SSL YAPILANDIRMASI
Directory Server için;
|
1 2 3 4 5 6 7 8 |
$ cd /etc/dirsrv/slapd-ldapmaster $ mkdir /ldap-backups/ && tar -cf /ldap-backups/db-backup.tar * $ echo "secretpw" > /tmp/pwdfile $ cd /etc/dirsrv/slapd-ldapmaster $ certutil -N -d . -f /tmp/pwdfile $ certutil -S -n "CA certificate" -s "cn=Domain CA Cert,dc=domian,dc=local" -2 -x -t "CT,," -m 1000 -v 120 -d . -k rsa -f /tmp/pwdfile $ certutil -S -n "Server-Cert" -s "cn=ldapmaster.domain.local,ou=Directory Server" -c "CA certificate" -t "u,u,u" -m 1001 -v 120 -d . -k rsa -f /tmp/pwdfile $ certutil -d . -L -n "CA certificate" -a > cacert.asc |
Sertifika listesini görmek için;
|
1 2 3 4 5 |
$ certutil -L -d . Certificate Nickname Trust Attributes SSL,S/MIME,JAR/XPI Server-Cert u,u,u CA certificate CTu,u,u |
GUI üzerinden ssl aktif etmek için sırasıyla;
Directory Server –> Configuration -> Encryption
Enable SSL for this server checkbox’ını seçiyoruz.

Sonrasında servisi restart ettiğimizde bize ssl sertifikası sırasında oluşturduğumuz parolayı soracak.
|
1 |
$ service dirsrv restart |
Şifre sormadan directory server servisi restart etmek için;
|
1 2 3 4 5 6 7 |
$ cd /etc/dirsrv/slapd-ldapmaster/ $ touch /etc/dirsrv/slapd-ldapmaster/pin.txt $ chmod 600 /etc/dirsrv/slapd-ldapmaster/pin.txt $ chown nobody /etc/dirsrv/slapd-ldapmaster/pin.txt $ LDAPPWD=$(cat /tmp/pwdfile) $ echo "Internal (Software) Token:$LDAPPWD" > /etc/dirsrv/slapd-ldapmaster/pin.txt $ service dirsrv restart |
SSL port testi;
|
1 |
$ netstat -tapn | egrep "389|636" |
Client üzerinden SSL ile bağlanmayı test etmek için;
|
1 |
$ ldapsearch -x -ZZ |
Administrator Server için;
|
1 2 3 4 5 |
$ cd /etc/dirsrv/admin-serv $ certutil -N -d . -f /tmp/pwdfile $ certutil -S -n "CA certificate" -s "cn=domaint Admin Server CA Cert,dc=domaint,dc=local" -2 -x -t "CT,," -m 1000 -v 120 -d . -k rsa -f /tmp/pwdfile $ certutil -S -n "Server-Cert" -s "cn=ldapmaster.domaint.local,ou=Admin Server" -c "CA certificate" -t "u,u,u" -m 1001 -v 120 -d . -k rsa -f /tmp/pwdfile $ certutil -d . -L -n "CA certificate" -a > cacert.asc |
Sertifika listesini görmek için;
|
1 |
$ certutil -L -d /etc/dirsrv/admin-serv/ |
GUI üzerinden ssl aktif etmek için sırasıyla;
Administrator Server –> Configuration -> Encryption
Enable SSL for this server checkbox’ını seçiyoruz.
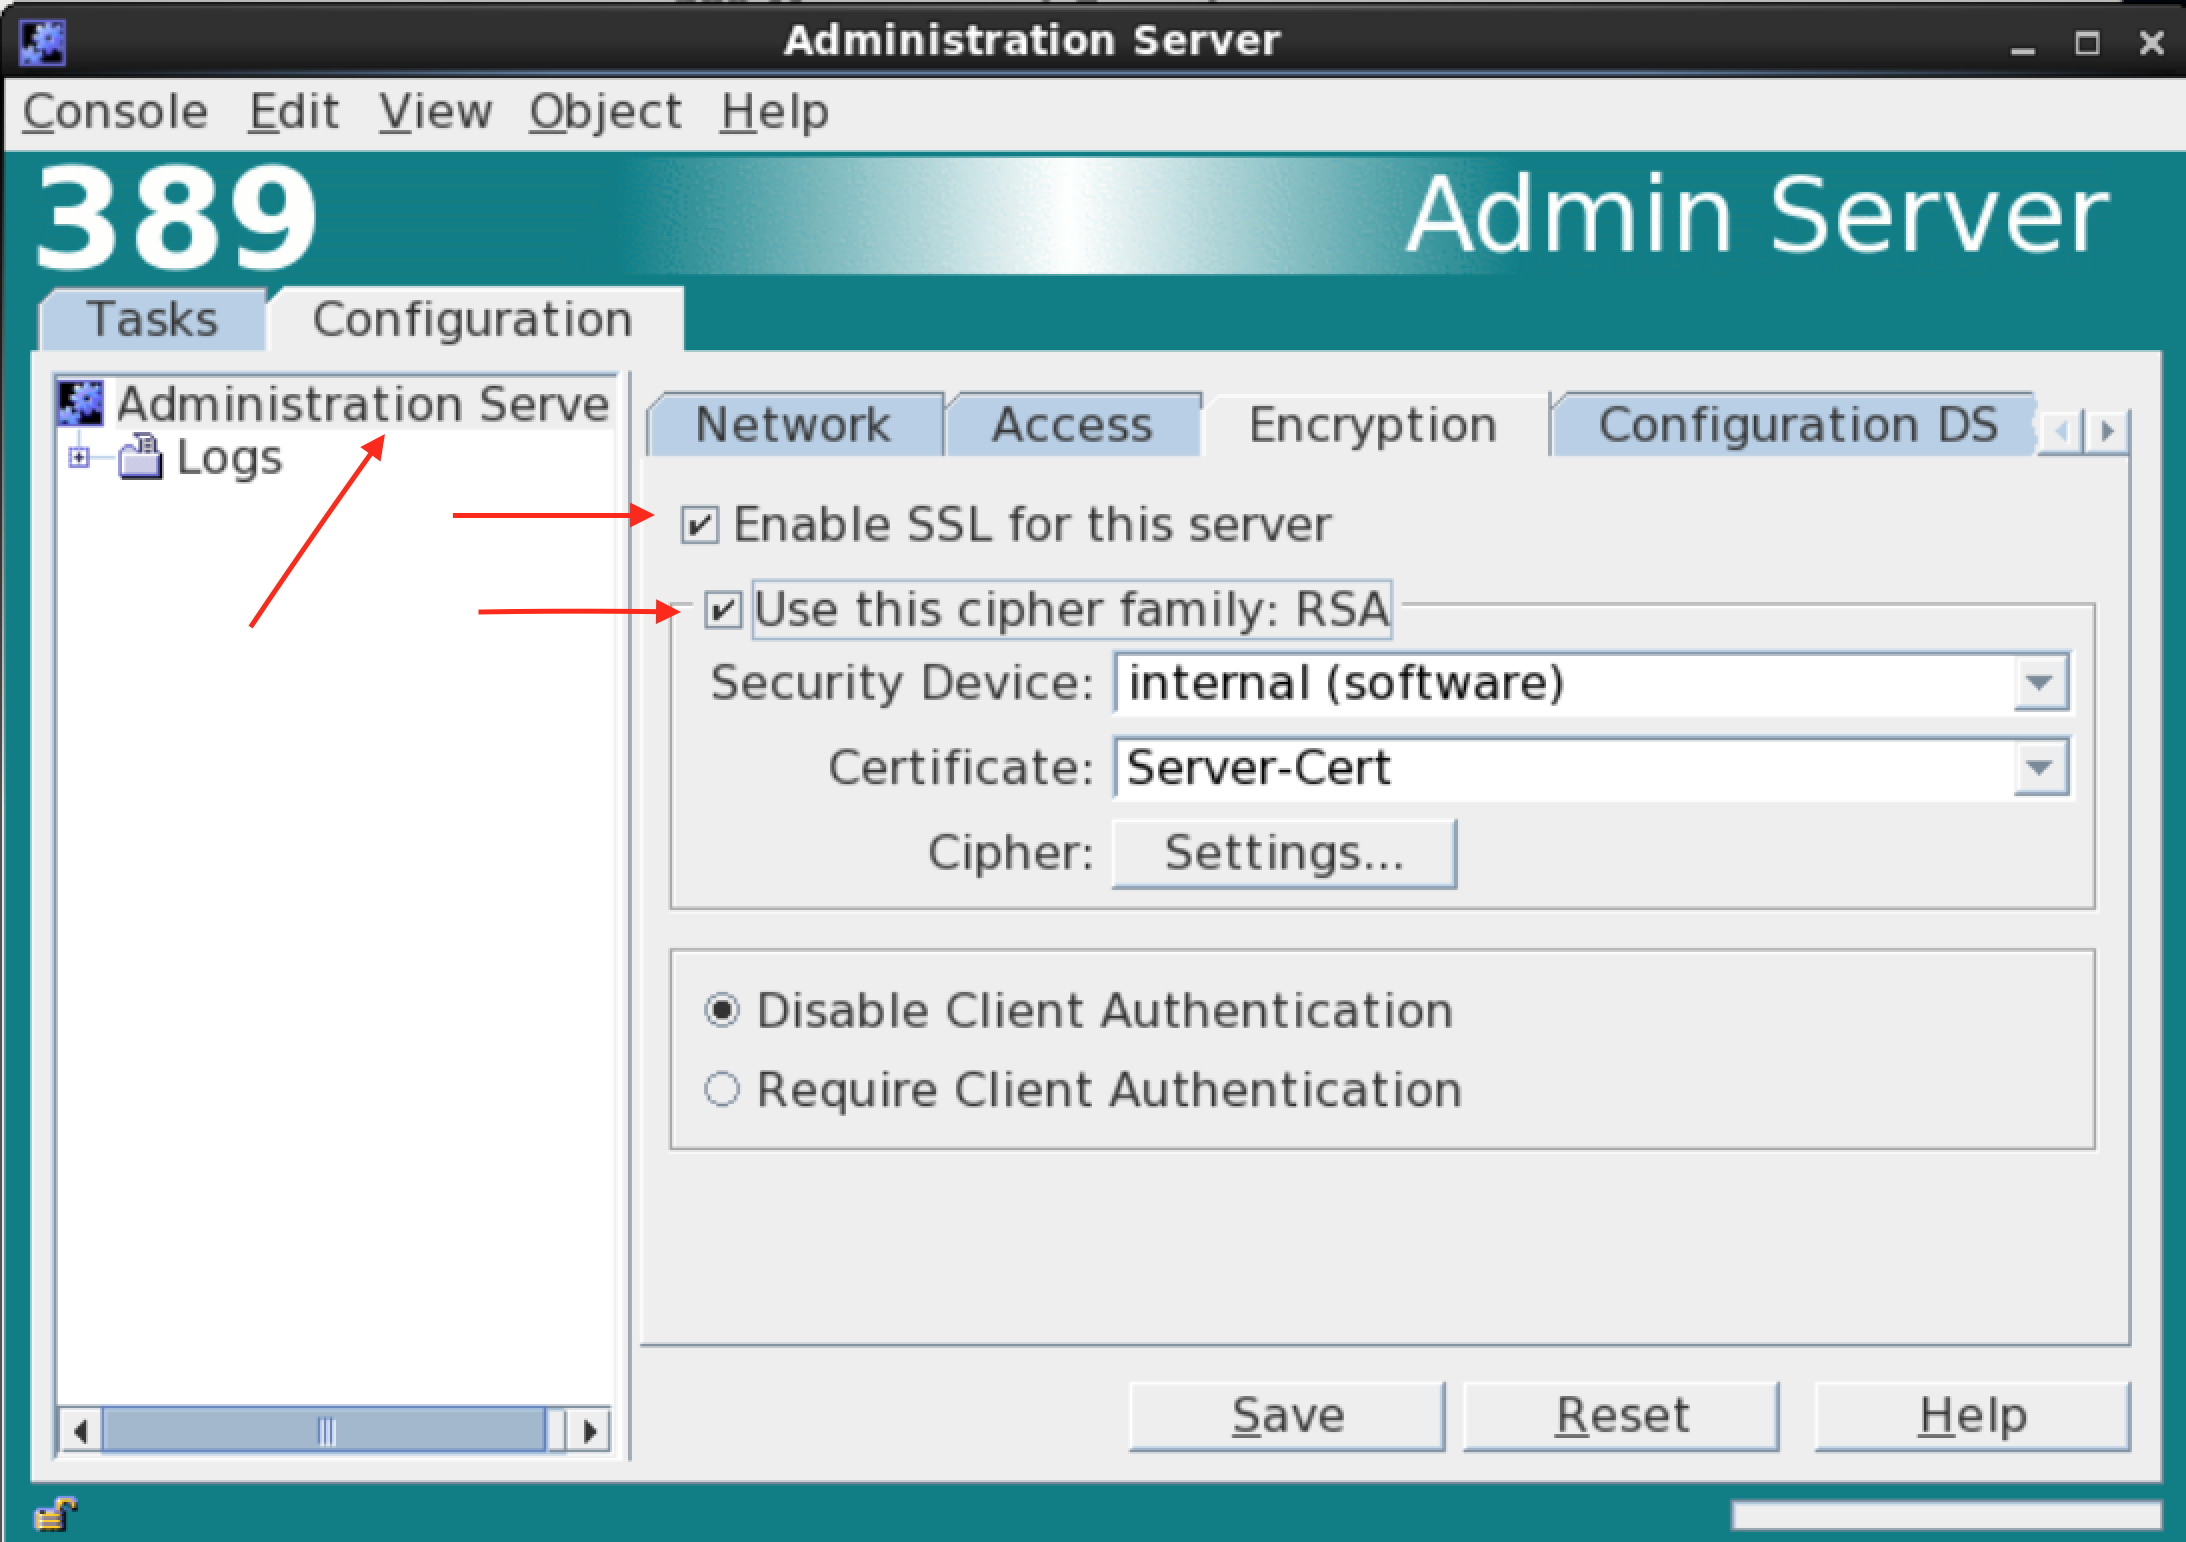
Sonrasında servisi restart ettiğimizde bize ssl sertifikası sırasında oluşturduğumuz parolayı soracak.
|
1 |
$ service dirsrv-admin restart |
Şifre sormadan directory server servisi restart etmek için;
|
1 2 3 4 5 6 7 8 |
$ vim /etc/dirsrv/admin-serv/nss.conf $ NSSPassPhraseDialog file://///etc/dirsrv/admin-serv/password.conf $ touch /etc/dirsrv/admin-serv/password.conf $ chmod 600 /etc/dirsrv/admin-serv/password.conf $ chown nobody /etc/dirsrv/admin-serv/password.conf $ LDAPPWD=$(cat /tmp/pwdfile) $ echo "internal:$LDAPPWD" > /etc/dirsrv/admin-serv/password.conf $ service dirsrv restart && service dirsrv-admin restart |
CLIENT KURULUMU VE YAPILANDIRMASI
|
1 2 3 4 |
$ date ( service ntpd start date kontrol)` $ service iptables stop; chkconfig iptables off` $ sed -i "s/SELINUX=enforcing/SELINUX=disabled/g" /etc/selinux/config;setenforce 0;` $ telnet ldapmaster.domain.local 389` |
NSLCD SERVICE İLE YAPILANDIRMA
|
1 2 3 4 5 6 7 |
$ echo "192.168.177.138 ldapmaster.domaint.local ldapmaster" >> /etc/hosts $ telnet ldapmaster.domaint.local 389 $ yum install telnet -y && telnet ldapmaster.domaint.local 389 $ rpm -Uvh http://ftp.linux.org.tr/epel/6/x86_64/epel-release-6-8.noarch.rpm $ rpm -Uvh http://rpms.famillecollet.com/enterprise/remi-release-6.rpm $ yum install nss-pam-ldapd authconfig openldap-clients $ authconfig --enableldap --enableldapauth --disableldaptls --enablemkhomedir --ldapserver="ldapmaster.domaint.local" --ldapbasedn="dc=domaint,dc=local" --update |
veya authconfig-tui ile yapılandırabiliriz.
|
1 2 3 |
$ authconfig-tui # (use ldap seçeneğini aktif edip ldap bilgilerini girmeliyiz.) (nsswitch.conf ve nslcd.conf dosyaları değişiyor!!) $ echo "session required pam_mkhomedir.so skel=/etc/skel/ umask=0022" >> /etc/pam.d/password-auth $ getent passwd |
nslcd config dosyasına aşağıdaki satırları eklemeliyiz.
|
1 2 3 |
$ vim /etc/nslcd.conf filter passwd (|(gidNumber=1002)(ou=system)) filter shadow (|(gidNumber=1002)(ou=system)) |
|
1 |
echo "sudoers: ldap" >> /etc/nsswitch.conf |
ldap config dosyasına aşağıdaki satırları eklemeliyiz.
|
1 2 3 4 5 6 |
$ vim /etc/sudo-ldap.conf uri ldap://ldapmaster.domain.local sudoers_base ou=SUDOers,dc=domain,dc=local bind_timelimit 30 timelimit 60 |
ssl için
|
1 2 3 |
$ vim /etc/openldap/ldap.conf TLS_CACERT /etc/openldap/cacerts/cacert.asc TLS_REQCERT allow |
|
1 |
$ ldapsearch -x -ZZ |
clear text control için
|
1 2 3 4 |
$ ldapsearch -x -ZZ -D "cn=Directory Manager" -w (client) $ tcpdump -i any 'tcp port 389' -w /tmp/389.dump (ldap master) $ yum install wireshark-gnome (ldap master) $ wireshark /tmp/389.dump (follow TCP stream) (ldap master) |
|
1 |
$ getent passwd #(ssl check) |
ssl için ldap ve nslcd config dosyalarında yapılacak düzenlemeler
|
1 2 3 4 5 6 |
$ vim /etc/openldap/ldap.conf TLS_CACERTDIR /etc/openldap/cacerts TLS_CACERT /etc/openldap/cacerts/cacert.asc TLS_REQCERT allow URI ldaps://ldapmaster.domaint.local/ BASE dc=domaint,dc=local |
|
1 2 3 4 5 6 |
$ vim /etc/nslcd.conf # This comment prevents repeated auto-migration of settings. uri ldaps://ldapmaster.domaint.local/ base dc=domaint,dc=local ssl yes tls_cacertdir /etc/openldap/cacerts |
SSSD SERVICE İLE YAPILANDIRMA
|
1 2 3 4 5 6 7 8 9 |
$ echo "192.168.177.138 ldapmaster.domaint.local ldapmaster" >> /etc/hosts $ yum install telnet -y && telnet ldapmaster.domaint.local 389 $ rpm -Uvh http://ftp.linux.org.tr/epel/6/x86_64/epel-release-6-8.noarch.rpm $ rpm -Uvh http://rpms.famillecollet.com/enterprise/remi-release-6.rpm $ yum install openldap-clients nss-pam-ldapd pam pam_ldap sssd sssd-ldap sssd-common authconfig openldap-clients libsss_idmap.x86_64 sssd-client.x86_64 $ echo "session required pam_mkhomedir.so skel=/etc/skel/ umask=0022" >> /etc/pam.d/password-auth $ echo "services: files sss" >> /etc/nsswitch.conf; $ echo "sudoers: files sss" >> /etc/nsswitch.conf; $ authconfig --enablesssd --enablesssdauth --enablelocauthorize --enableldap --enableldapauth --ldapserver=ldap://ldapmaster.domaint.local:389 --disableldaptls --ldapbasedn=dc=domaint,dc=local --enablerfc2307bis --enablemkhomedir --enablecachecreds --update |
Örnek sssd config dosyası
|
1 2 3 4 5 6 7 8 9 10 11 12 13 14 15 16 17 18 19 20 21 22 23 24 25 26 27 28 29 30 31 32 33 34 35 36 37 |
$ vim /etc/sssd/sssd.conf [sssd] config_file_version = 2 services = nss, pam, ssh, sudo domains = LDAP reconnection_retries = 3 sbus_timeout = 30 [nss] filter_users = root,ldap,named,avahi,haldaemon,dbus,radiusd,news,nscd filter_groups = root reconnection_retries = 3 entry_cache_nowait_percentage = 75 homedir_substring = /home [pam] reconnection_retries = 3 offline_credentials_expiration = 2 offline_failed_login_attempts = 3 offline_failed_login_delay = 5 [domain/LDAP] id_provider = ldap auth_provider = ldap sudo_provider = ldap chpass_provider = ldap access_provider = ldap ldap_access_filter = host=app-test autofs_provider = ldap ldap_uri = ldap://ldapmaster.domaint.local:389 ldap_search_base = dc=domaint,dc=local ldap_group_search_base = ou=groups,dc=domaint,dc=local ldap_sudo_search_base = ou=sudoers,dc=domaint,dc=local ldap_group_member = memberUid ldap_group_name = cn ldap_id_use_start_tls = False cache_credentials = True ldap_tls_cacertdir = /etc/openldap/cacerts debug_level = 9 |
kontrol için
|
1 |
$ getent passwd |